Tips to Cover Acne and Blemishes
1. Cleanse and pat skin dry.
2. Apply The EraseZit™ Antiseptic Concealer Pencil directly on blemishes and oily areas around chin, nose and forehead. The pencil will diminish the redness instantly. Blend evenly. Use under foundation, touch-ups over foundation, or without foundation.
Note: This is a cosmetic solution. Camouflage makeup does not take the place or interfere with your doctor’s advice.
Tips to Cover Under-eye Bags & Puffiness
Very heavy bags and puffiness are extremely hard to cover and it is best to try to detract from the problem by focusing on your eye makeup and highlighting your lip and cheek color.
-If you have a light to medium puff your brush is your best friend. I always used an eyeliner brush and applied a light color right under the puff to lighten the dark area. Do this over your foundation. The effect is that you want to cancel out the shadow that lies right underneath the puff (or bag if you will!).
-Heavy concealer will make it look worse so start lightly, you can always add more. Blend very carefully then powder. TA DA, the puff will look less obvious. I use to have to do this every day of my life until at the ripe old age of 35, when I went to a surgeon!!!” Look Ma, no more puffy eyes!!!”
Tips to Cover Dark Under-Eye Circles & Shadows
If you try to cover with a concealer that is too light, you will wind up with a grey ashy look that is worse than what you started out with!
-Orange Masking Crème™ is designed to conceal and neutralize very dark circles. The Everything Pencil™ offers certain colors which also conceal and neutralize such as Pure Beige or Pink Glow.
-To keep things as natural as possible, apply your foundation first and then top off with your concealer. Cover the inner corner of the eye where it is darkest and follow through to the inner half of the under eye. This way if you have the beginnings of fine lines, you are not adding weight to the outer half and showing off the problem.
-You will get the most natural cover with a brush. You have much more control with a brush than you have with your fingers and you will use less product. But, if you prefer to use your finger, opt for your ring finger, as it is weaker and will apply less pressure to the delicate skin.
HINT: You should always use an eye cream before applying any type of concealer, but let it absorb for 60 seconds before you apply product.
Tips to Cover Veins
For small veins/broken capillaries on your face, The Everything Pencil™ may be all you need. Choose the color closest to your skin tone-you may need a lighter and darker pencil to create a perfect match. Apply directly on problem areas, then pat and blend gently.
For legs:
-Apply The Everything Pencil™ first to cover small imperfections such as bruises, freckles or spider veins. Start with the color closest to your skin tone, then layer another color (lighter or darker as necessary) .
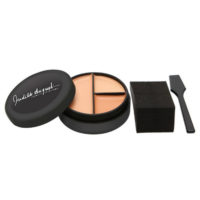
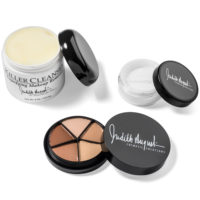
-For larger area of veins and dark discolorations, use Killer Cover™. Start with the color closest to your skin tone-remove product with the enclosed spatula and apply to area on your leg. Warm the product with your fingers for easier spreading. Layer colors if necessary.
-Blue and black veins and bruises are best covered starting with a darker color shade concealer first. Set with powder. Then apply a color close to your skin tone on top. Blend into the surrounding areas of the leg so there is no line of demarcation. Powder again to set.
Tips to Cover Tattoos
-For dark tattoos, use Killer Cover™ and pick a shade darker than your skin tone first. Apply over tattooed area. Set with Make It Stay – Colorless Setting Powder and then layer a shade closest to your skin tone on top. Blend out and set with powder again.
-Use Make It Stay, Makeup Spray to seal everything together.
Tips to Cover Port Wine Stains & Birthmarks
If the mark that is being covered is around the eye area and you need heavier make up. Do not use any eye creams or moisturizers prior to concealment. Any make up has to be on dry skin to stay.
-When applying Killer Cover™, start off with a very thin layer of make-up, and add more layers as needed. Pat with powder in between layers using a cotton pad or puff. Do not miss any area that concealer has been placed. Gently brush off the excess in a downward motion.
-Use a lighter color on the birthmark first. Without blending, use a second darker color and blend with your finger to match the birthmark with the surrounding color of your skin. Remember, always blend, and never rub.
-If your birthmark is on your cheek or eye, after concealing, use blush and eye shadow that are the same color as your birthmark. Your make up will look very natural.
Tips to Cover Vitiligo
-For very small white spots due to hypo-pigmentation or vitiligo, The Everything Pencil™ may be all you need. To mix shades of The Everything Pencil, swirl one color on the back of your hand and then swirl the other color on top of it. Use your fingers to blend the two colors together.
-For larger areas, use Killer Cover. Mix different shades on the back of your hand to achieve your perfect color.
How to apply Killer Cover
1. Use the back of your hand as a blending palette. This will provide a more even application than blending directly on your skin.
2. Take the edge of a spatula and “shave off” a small amount of product and put it on your hand. You need very little of because it is so concentrated.
3. Start with a quarter size amount in the color closest to your “natural skin tone”. Then, place a small dab of a lighter and a darker tone next to it. Using your fingertips, blend colors together to create your perfect shade.
4. The warmth of your fingers will “liquefy” the product for smoother application.
5. Take your non-latex blending sponge and pick up the product from your hand. Tap the makeup onto the affected area using a slight “rolling” motion. By doing this you will not lift the makeup off the skin; you are blending into the skin.
Don’t forget your NO, NO words…NO STROKING, NO SMEARING, NO PULLING.
6. Feather out the edges until the makeup blends seamlessly into the skin.
7 . Set your art work with loose translucent powder using a powder puff. Let it set for three minutes. Buff off excess with a powder brush.
Tip: It is important that you take Killer Cover concealer out of the jar before applying. The product needs some warmth either by your fingers or cosmetic spatula for easier application. It is most effective when using a powder to set it.